Buscar contenidos

lunes, 25 de noviembre de 2019

Flutter es un framework para crear aplicaciones móviles para iOS y Android


https://codigofacilito.com/articulos/flutter-multiplataforma


Flutter es un framework para crear aplicaciones móviles para iOS y Android, el propósito del framework es facilitar la creación de aplicaciones estéticas, nativas y de alto rendimiento desde una misma base de código.
Desde que se introdujo esta herramienta de trabajo, se ha convertido en uno de los más populares, miles de empresas y desarrolladores aprenden o inician a crear proyectos con Flutter, desde Google hasta Alibaba.
Puedes seguir esta presentación para conocer Flutter a detalle:

POR QUÉ USAR FLUTTER

En general, un framework de trabajo como Flutter ofrece incontables características, beneficios y facilidades para desarrollar una aplicación, sin embargo, creo que podemos destacar algunas características de Flutter que lo hacen tan popular entre los desarrolladores:
  • Desarrollo ágil, con features como Hot reload, que te permite hacer cambios y ver las actualizaciones de manera instantánea.
  • Apps nativas con una misma base de código. A diferencia de otros frameworks donde la gran parte del código se comparte, en Flutter el 100% del código funciona para ambas plataformas, y no tienes que escribir código personalizado para ninguna, esto mientras compila a aplicaciones nativas.
  • Alto rendimiento. Las apps de Flutter funcionan a 60fps, lo que ofrece una percepción de rendimiento altísimo, animaciones fluidas, actualizaciones rápidas, etc.
  • UI estética. Flutter ofrece componentes de interfaz gráfica listos para usarse, mismos que respetan los sistemas de diseño de ambos iOS y Android, destacando por supuesto Material Design, por lo que las apps se ven bien tan pronto las construyes.
Además de eso, Google ha invertido muchísimo en la difusión del framework y en la creación de recursos que te permitan aprender a desarrollar apps para el mismo, por lo que terminas con un muy buen framework, buenos recursos para aprender, el respaldo de un gigante como Google.

FLUTTER 1.5

Durante el Google I/O 2019, se presentó una actualización importante al framework. Con la versión 1.5, Flutter pasaba de ser un framework para aplicaciones móviles, y se convertía en un framework multiplataforma para crear aplicaciones que funcionen en móvil, web, desktop y embebidos, todo con la misma base de código.
Imagen de Flutter que explica su enfoque multiplataforma
Luego del éxito que ha tenido Flutter como framework para aplicaciones nativas, el equipo ha estado trabajando en una forma de llevar ésta popular experiencia de desarrollo a otras plataformas y entornos.
Con el anuncio, se introdujo un Technical Preview para Flutter y la web, por lo que desde hoy, puedes crear aplicaciones web y aplicaciones web progresivas usando Flutter. Flutter Web no busca reemplazar HTML, está pensado para las aplicaciones con interfaces que se actualizan constantemente y de alta interacción.
Por último, es importante mencionar que Flutter Web es un trabajo en progreso, así que aún queda mucho tiempo antes de que podamos usarlo en producción.
Además de Flutter Web, se presentó una primer versión de lo que eventualmente será Flutter para Desktop, con lo que podrás construir apps para macOS, Windows y Linux. Puedes encontrar una guía del equipo de Flutter para crear apps desktop usando Flutter aquí. Tal como Flutter Web, este es un primer acercamiento a Flutter Desktop, y tendrá que pasar algo de tiempo antes de que podamos empezar a desarrollar apps para producción con Flutter.

CÓMO INICIAR CON FLUTTER

Flutter es un framework que usa como lenguaje de programación Dart, un lenguaje creado por Google pensado para trabajar desde el cliente, inicialmente como sustituto de JavaScript, que hoy se usa casi únicamente en conjunto con Flutter.
Puedes aprender Dart, el lenguaje de programación, aquí en CódigoFacilito siguiendo este enlace: https://codigofacilito.com/cursos/dart
Luego de Dart, puedes iniciar con Flutter usando nuestro curso de introducción al framework: https://codigofacilito.com/cursos/introduccion-flutter
Otro excelente recurso para especializarse en Flutter es suscribirse y seguir el canal oficial de Flutter en YouTube, donde el equipo de desarrollo de Flutter y el de difusión, suben contenido constante acerca de esta tecnología: https://www.youtube.com/channel/UCwXdFgeE9KYzlDdR7TG9cMw
Udacity, cuenta también con cursos de Flutter (en inglés) creados en colaboración con Google, por lo que también son una muy buena opción, este es el link para seguirlo: https://www.udacity.com/course/build-native-mobile-apps-with-flutter--ud905
Sin importar qué recurso uses, parece que no ha habido mejor momento para aprender Flutter que hoy, especialmente luego de que dejó de ser un framework móvil, para convertirse en uno multipltataforma que funcionará en móviles, la web, desktop, chrome OS y embebidos. ¿Increíble, no?

martes, 5 de noviembre de 2019

FullCalendar.Calendar jsfiddle


http://jsfiddle.net/a7mad24/jso51pm6/


Implement Gmail And Facebook Based Authentication In ASP.NET Core 2.2

https://www.c-sharpcorner.com/article/implement-gmail-and-facebook-based-authentication-in-asp-net-core-2-2/

Implement GMAIL Login Authentication

 
Step 1
 
If we want to implement Gmail Login authentication in our web application, then we first need to create a client-id into the Google Sign-In API Website. For that, let us go to the following Google website.
 
https://developers.google.com/identity/sign-in/web/sign-in#before_you_begin
 
Implement Gmail And Facebook Based Authentication In ASP.NET Core 2.2 
 
Step 2
 
Now, click on the "Configure Project" button.
 
Step 3
 
Now, select Create --> New Project options.
 
Implement Gmail And Facebook Based Authentication In ASP.NET Core 2.2
 
Step 4
 
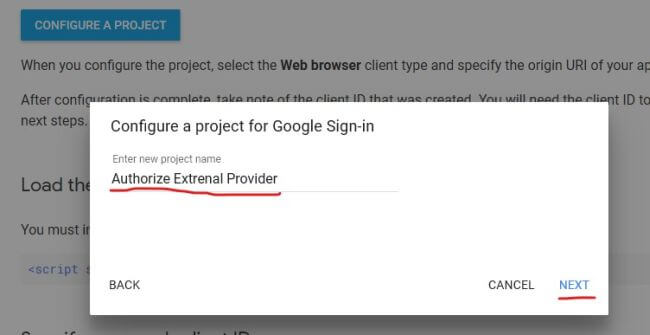
Provide a meaningful Project Name and click on the "Next" button.
 
Implement Gmail And Facebook Based Authentication In ASP.NET Core 2.2
 
Step 5
 
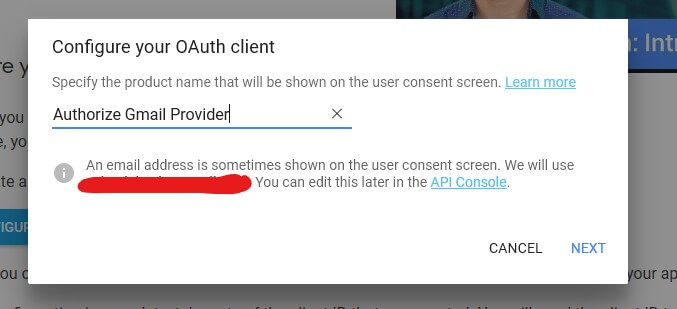
Provide the product name in the "Configure OAuth Client" window.
 
Implement Gmail And Facebook Based Authentication In ASP.NET Core 2.2
 
Step 6
 
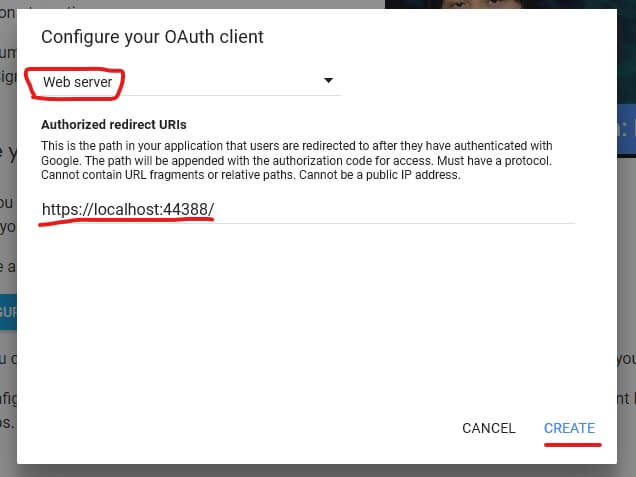
Now, select Web Server from the List.
 
Step 7
 
Now, in the Authorized Redirect URL, provide the application URL. The redirect URL will be like this - https://localhost:2213/signin-google.
You just need to change the hosted URL in the above example.
 
Implement Gmail And Facebook Based Authentication In ASP.NET Core 2.2
 
Step 8
 
Click on the "Create" button.
 
Step 9
 
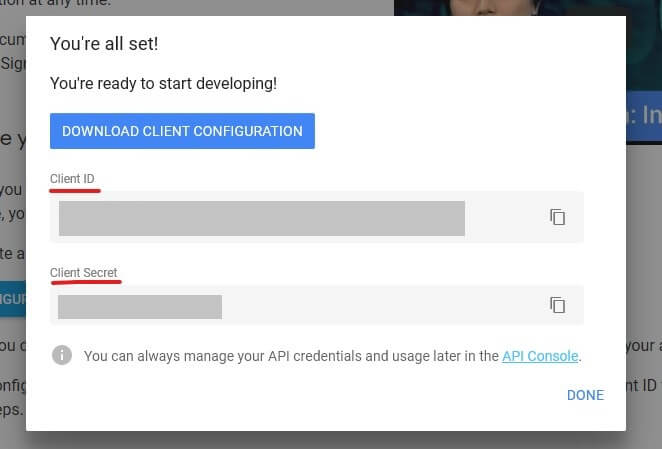
Now, the configuration is complete and we need to copy the Client Id and Client Secret from the popup window.
 
Implement Gmail And Facebook Based Authentication In ASP.NET Core 2.2
 
Step 10
 
Click the "Done" button.
 
Step 11
 
Now, open the appsettings.json file and create the two keys for client id and client secret id,
  1. {  
  2.   "ConnectionStrings": {  
  3.     "DefaultConnection""Server=Deb;Database=DemoAuthentication;Trusted_Connection=True;MultipleActiveResultSets=true;user id=sa;password=xxxxxxxxxxxxxx;"  
  4.   },  
  5.   "Logging": {  
  6.     "LogLevel": {  
  7.       "Default""Warning"  
  8.     }  
  9.   },  
  10.   "AllowedHosts""*",  
  11.   "Authentication:Google:ClientId""xxxxxxxxxxxxxx",  
  12.   "Authentication:Google:ClientSecret""xxxxxxxxxxxxxx",  
  13. }  
Step 12
 
Now open the following URL https://console.developers.google.com/projectselector/apis/library and login with your Google account credentials.
 
Implement Gmail And Facebook Based Authentication In ASP.NET Core 2.2
 
Step 13
 
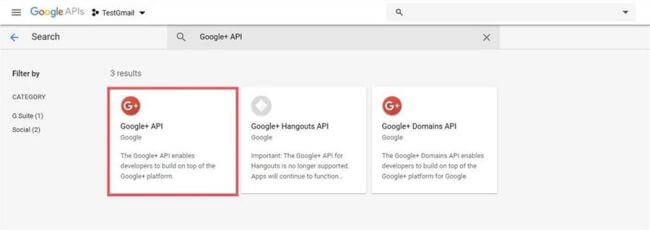
Now select the Project name mentioned in the above and then search Google+ API options.
 
Step 14
 
Now click on Google API options
 
Step 15
 
Now click on Enabled Button.
 
Implement Gmail And Facebook Based Authentication In ASP.NET Core 2.2
 
Step 16
 
Now return back to our visual studio and open the startup.cs file.
 
Step 17
 
Now the add the below code in the ConfigureService() method.
  1. public void ConfigureServices(IServiceCollection services)  
  2.         {  
  3.             services.Configure<CookiePolicyOptions>(options =>  
  4.             {  
  5.                 // This lambda determines whether user consent for non-essential cookies is needed for a given request.  
  6.                 options.CheckConsentNeeded = context => true;  
  7.                 options.MinimumSameSitePolicy = SameSiteMode.None;  
  8.             });  
  9.   
  10.             services.AddDbContext<ApplicationDbContext>(options =>  
  11.                 options.UseSqlServer(  
  12.                     Configuration.GetConnectionString("DefaultConnection")));  
  13.             services.AddDefaultIdentity<IdentityUser>()  
  14.                 .AddDefaultUI(UIFramework.Bootstrap4)  
  15.                 .AddEntityFrameworkStores<ApplicationDbContext>();  
  16.   
  17.             services.AddMvc().SetCompatibilityVersion(CompatibilityVersion.Version_2_2);  
  18.   
  19.             services.AddAuthentication().AddGoogle(googleOptions =>  
  20.             {  
  21.                 googleOptions.ClientId = Configuration["Authentication:Google:ClientId"];  
  22.                 googleOptions.ClientSecret = Configuration["Authentication:Google:ClientSecret"];  
  23.             });  
  24.   
  25.              
  26.         }  
Step 18
 
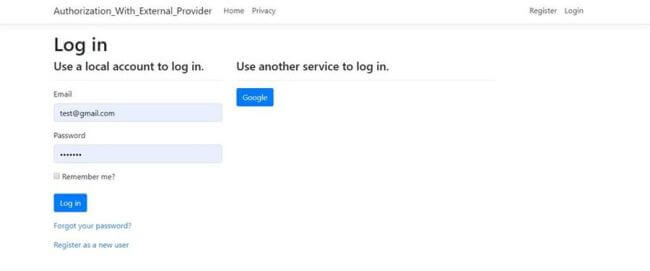
Now run the application and click on Sign In Option.
 
Implement Gmail And Facebook Based Authentication In ASP.NET Core 2.2
 
Step 19
 
Now click on Google Button. 
 
Step 20
 
It will complete your registration with Gmail authentication.
 

IMPLEMENT FACEBOOK LOGIN AUTHENTICATION

 
If we want to implement Facebook Login authentication in your web application, then we first need to follow the below steps to implement Facebook authentication in your application.
 
Step 1
 
First, open the Facebook developer app URL https://developers.facebook.com/apps/. If you have already a Facebook account then log in with that credential or Sing Up in Facebook as a new user. 
 
Step 2
 
After a successful login, it will redirect to your home page of the Facebook developer app.
 
Step 3
 
Now click on the Create a New App Button.
 
Implement Gmail And Facebook Based Authentication In ASP.NET Core 2.2
 
Step 4
 
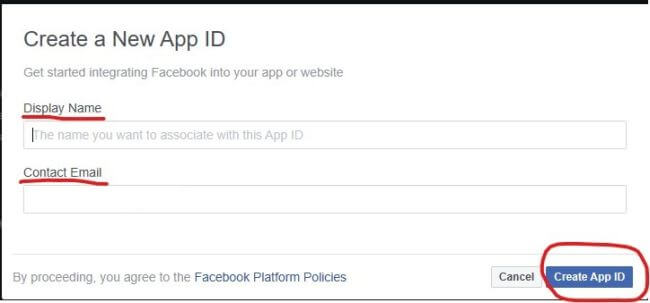
Now fill the New App create a form with necessary information like App Display Name, contact email id, etc. and then click on Create App Id.
 
Implement Gmail And Facebook Based Authentication In ASP.NET Core 2.2
 
Step 5
 
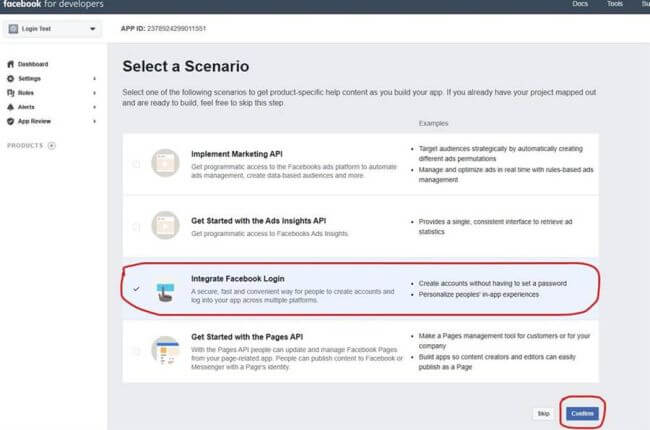
After successful creation of the App Id, it will redirect you to the Scenario UI.
 
Step 6
 
In the scenario list, select Integrate Facebook Login and click on the Confirm button.
 
Implement Gmail And Facebook Based Authentication In ASP.NET Core 2.2
 
Step 7
 
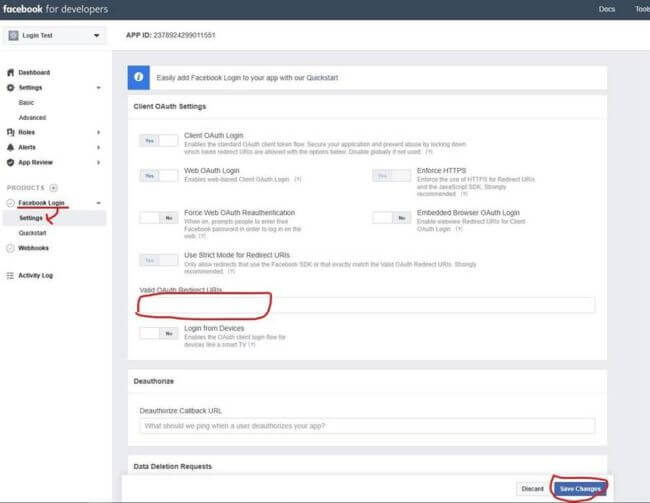
Now click on the Facebook Login option under Product category in the left panel of the page.
 
Step 8
 
Now click on the Settings options.
 
Step 9
 
It will open the Client OAuth Setting page
 
Implement Gmail And Facebook Based Authentication In ASP.NET Core 2.2
 
Step 10
 
Now in the Valid OAuth Redirect URLs box provide the application host URL append with /signin-facebook (as for example:- https://localhost:4356/signin-facebook).
 
Step 11
 
Now click on the Save changes button.
 
Step 12
 
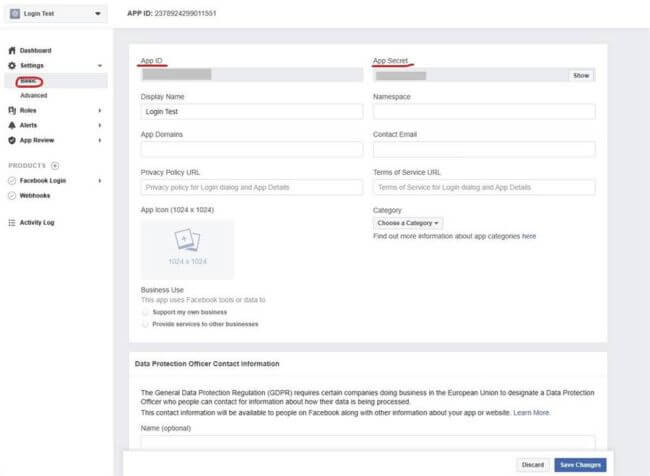
Now click on the Basic option under Setting in the Left Panel.
 
Step 13
 
Now copy the App Id and App Secret which is required to use the visual studio to configure the Facebook Authentication.
 
Implement Gmail And Facebook Based Authentication In ASP.NET Core 2.2
 
Step 14
 
Now add the App Id and App Secret key in the appsettings.json file.
  1. {  
  2.   "ConnectionStrings": {  
  3.     "DefaultConnection""Server=Deb;Database=DemoAuthentication;Trusted_Connection=True;MultipleActiveResultSets=true;user id=sa;password=xxxxxxxxxxxxxx;"  
  4.   },  
  5.   "Logging": {  
  6.     "LogLevel": {  
  7.       "Default""Warning"  
  8.     }  
  9.   },  
  10.   "AllowedHosts""*",  
  11.   "Authentication:Google:ClientId""xxxxxxxxxxxxxx",  
  12.   "Authentication:Google:ClientSecret""xxxxxxxxxxxxxx",  
  13.   "Authentication:Facebook:AppId""xxxxxxxxxxxxxx",  
  14.   "Authentication:Facebook:AppSecret""xxxxxxxxxxxxxx"  
  15. }  
Step 15
 
In the Startup.cs file add the Facebook authentication in the ConfigureService() method.
  1. public void ConfigureServices(IServiceCollection services)  
  2.         {  
  3.             services.Configure<CookiePolicyOptions>(options =>  
  4.             {  
  5.                 // This lambda determines whether user consent for non-essential cookies is needed for a given request.  
  6.                 options.CheckConsentNeeded = context => true;  
  7.                 options.MinimumSameSitePolicy = SameSiteMode.None;  
  8.             });  
  9.   
  10.             services.AddDbContext<ApplicationDbContext>(options =>  
  11.                 options.UseSqlServer(  
  12.                     Configuration.GetConnectionString("DefaultConnection")));  
  13.             services.AddDefaultIdentity<IdentityUser>()  
  14.                 .AddDefaultUI(UIFramework.Bootstrap4)  
  15.                 .AddEntityFrameworkStores<ApplicationDbContext>();  
  16.   
  17.             services.AddMvc().SetCompatibilityVersion(CompatibilityVersion.Version_2_2);  
  18.   
  19.             services.AddAuthentication().AddGoogle(googleOptions =>  
  20.             {  
  21.                 googleOptions.ClientId = Configuration["Authentication:Google:ClientId"];  
  22.                 googleOptions.ClientSecret = Configuration["Authentication:Google:ClientSecret"];  
  23.             });  
  24.   
  25.             services.AddAuthentication().AddFacebook(facebookOptions =>  
  26.             {  
  27.                 facebookOptions.AppId = Configuration["Authentication:Facebook:AppId"];  
  28.                 facebookOptions.AppSecret = Configuration["Authentication:Facebook:AppSecret"];  
  29.             });  
  30.         }  
Step 16
 
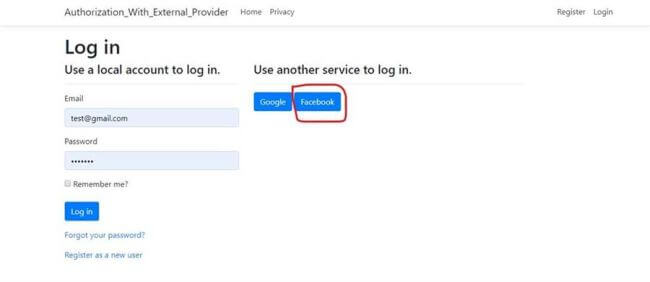
Now run the application and then click on the Login button.
 
Implement Gmail And Facebook Based Authentication In ASP.NET Core 2.2
 
Step 17
 
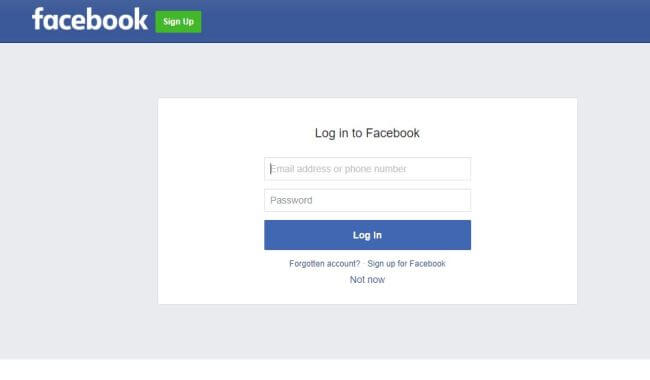
On clicking on the Facebook button, it will redirect to the Facebook Login Authentication URL where we need to provide Facebook credentials and then click on the Login Button. 
 
Implement Gmail And Facebook Based Authentication In ASP.NET Core 2.2
Step 18
 
After authenticating your credentials, Facebook will return to your applications. 
 

Conclusion


In this article, we discussed the implementation steps related to external authentication using Gmail and Facebook. I hope this will help the readers to understand how to implement Gmail or Facebook authentication in any application. If anybody has any queries or doubts related to this article, please let me know. Feedback is most welcome related to this article. In the next article, we will discuss how to implement external authentication using a Microsoft Account and Twitter Account in ASP.NET Core.