https://www.youtube.com/watch?v=0fTSKtPBLUc
https://drive.google.com/file/d/1PgipOrZBqEbgXCK8VGguR3XSwsk9Ww9T/view
https://www.youtube.com/watch?v=0fTSKtPBLUc
https://drive.google.com/file/d/1PgipOrZBqEbgXCK8VGguR3XSwsk9Ww9T/view
Fuente: https://www.jcchouinard.com/python-automation-using-task-scheduler/
This post is part of the complete Guide on Python for SEO
This post will show you how to schedule a Python Script execution using Windows Task Scheduler. This will help you automate tasks using Python on Windows.
Use crontab for python script automation on Mac.
With python scripts, you could extract data from Google Search Console and Google Analytics every day and send yourself a weekly email report. You could log all your keywords every day or automate your keywords research.
Before we can cover all that, we need to learn how to use Windows Task Scheduler.
What is Windows Task Scheduler?
Windows Task Scheduler is a component that gives the ability to schedule and automate tasks in Windows by running scripts or programs automatically at a given moment.
To run your python scheduler you will need to create a task, create an action, add the path to your python executable file and to you python script and add a trigger to schedule your script.
Search for “Task Scheduler”.

This will open the Windows Task Scheduler GUI.
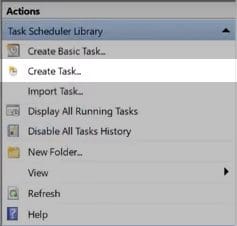
Go to Actions > Create Task…

Give a name

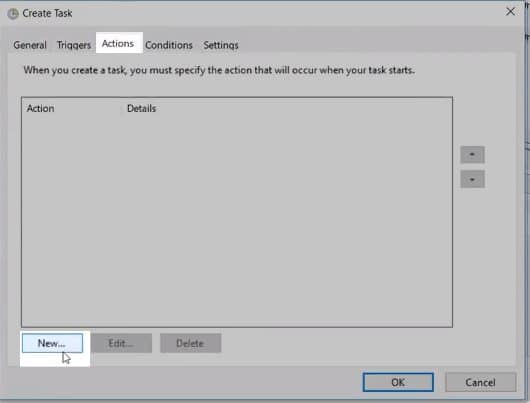
Go to Actions > New

Find the Python Path using where python in the command line.

From the command prompt copy the script to use in the action.
C:\yourpath\python.exeor in my case
C:\Users\j-c.chouinard\AppData\Local\Continuum\anaconda3\python.exe
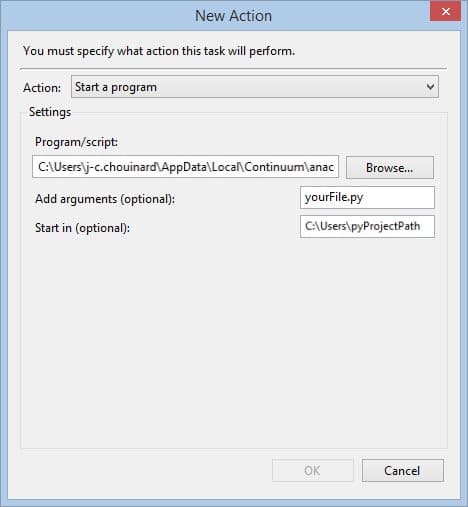
In Program/Script, add the path that you have copied from the command line.
Go to the folder where your Python script is located. Right-click on the file and select Copy as path.
If you have a file located at this location.
C:\user\your_python_project_path\yourFile.py
In the "Add arguments (optional)” box, you will add the name of your python file.
yourFile.py
In the "Start in (optional)" box, you will add the location of your python file.
C:\user\your_python_project_path

Click “OK”.
Note: Alternatively, you could create a batch file combining your Python script and Python executable file in a
.batfile.
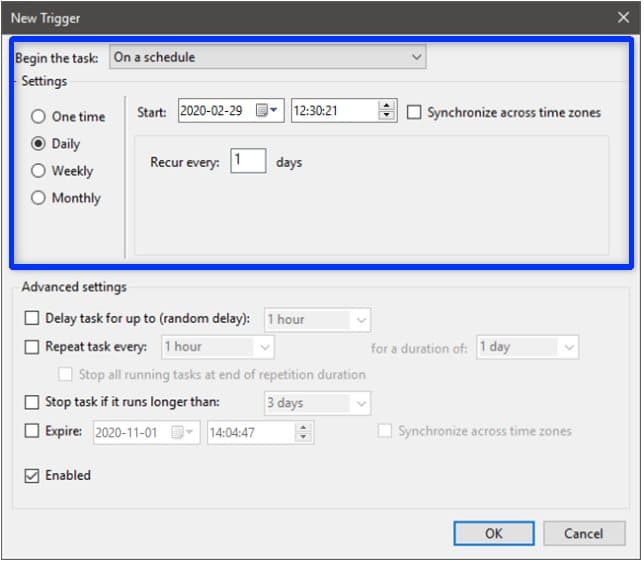
Go to “Triggers” > New
Choose the repetition that you want. Here you can schedule python scripts to run daily, weekly, monthly or just one time.

Click “OK”
Once, you have set this up, your trigger is now active and your python script will run automatically every day.
That’s it, you now know how to run a Python script automatically using Windows Task Scheduler.
Tomado de: https://rlaput.github.io/Azure-GitLab-Autodeploy/
This post is about deploying an application from GitLab source control to Azure App Service. Since this post is just to show you how to do it, you should already have intermediate knowledge on the following:

As you can see in the image above, GitLab is not in the choices. We will be using the External option in this post.
In your Azure portal, click on your App Service and scroll down to Development Tools option group. Choose Advanced Tools and click Go.

You will be redirected to Kudu Services for your App Service:

Add /api/sshkey?ensurePublicKey=1 to the url above to generate a public SSH key for the app service. Press enter.

You will be navigated to a very simple page with the text "ssh-rsa <hashed string here>". Copy the text without the beginning and trailing quotation marks to a text editor. We will use this later on.
Navigate to your project in GitLab. Go to Settings->Repository.

Expand Deploy Keys. Input your desired deploy key name in the Title field. Paste the generated public SSH key from Kudu into the Key field. Leave the Write access allowed checkbox unchecked (since we only need to give read access to Kudu for deployment) and click Add key.

Navigate to you App Service in Azure Portal. Open Deployment Center, choose External, then click Continue.

Choose App Service Kudu build server as build provider then continue.

Copy your GitLab project SSH Url.

Paste it into the Repository field. Enter branch name to be deployed. Choose Git for repository type. Continue and Finish.

Wait for a few seconds and let Azure deploy your app. Status will change to Success when the deployment succeeds. If there are new changes to master branch, click on Sync so that Azure will pull and deploy the latest changes.

The steps above allow us to deploy an application from source control manually using Azure portal. The next procedures will allow us to automate the deployment to Azure everytime there are new changes in that branch using webhooks.
First, we need our app credentials so that our webhook can authenticate to Kudu and let it deploy our application using its deploy endpoint. Go to Deployment Center, click on Deployment Credentials beside Sync, then copy the password.

The deploy endpoint format:
https://$<sitename>:<password>@<sitename>.scm.azurewebsites.net/deploy
Replace <sitename> with your App Service name and <password> with the password you copied from deployment credentials. Example: https://$testautodeployappsvc:rTi7HJX8t1Lb0C638n0mJGppLA7Kwva6HjrwudBKHF9jhxeN7bls02sjrd6X@testautodeployappsvc.scm.azurewebsites.net/deploy
Navigate to your project in GitLab, go to Settings->Integrations. Input the constructed url above based on your site name and password. Check Push events and input master in the field. This means that deployment webhook will be triggered when there is a push event in master branch. Finally, click Add webhook button.

Now, I tried pushing a commit in master branch with comment message some change in master branch. Upon checking Deployment Center, the latest change has been deployed automatically without clicking Sync button.

using System;
namespace POC_OCR_ConsoleApp
{
class Program
{
static void Main(string[] args)
{
var ocr = new IronOcr.IronTesseract().Read(@"C:\Users\EBS-WC-LPT01\Downloads\2021-07-16_10h51_54.png");
Console.WriteLine(ocr.Text);
Console.ReadLine();
}
}
}
https://blog.sqlauthority.com/2013/09/26/sql-server-select-columns-from-stored-procedure-resultset/
First we will create a sample stored procedure.
1 2 3 4 5 6 | CREATE PROCEDURE SampleSPASSELECT 1 AS Col1, 2 AS Col2UNIONSELECT 11, 22GO |
Now we will create a table where we will temporarily store the result set of stored procedures. We will be using INSERT INTO and EXEC command to retrieve the values and insert into temporary table.
1 2 3 4 5 | CREATE TABLE #TempTable (Col1 INT, Col2 INT)GOINSERT INTO #TempTableEXEC SampleSPGO |
Next we will retrieve our data from stored procedure.
1 2 3 | SELECT *FROM #TempTableGO |
Finally we will clean up all the objects which we have created.
1 2 3 | DROP TABLE #TempTableDROP PROCEDURE SampleSPGO |
Let me know if you want me to share such back to basic tips.